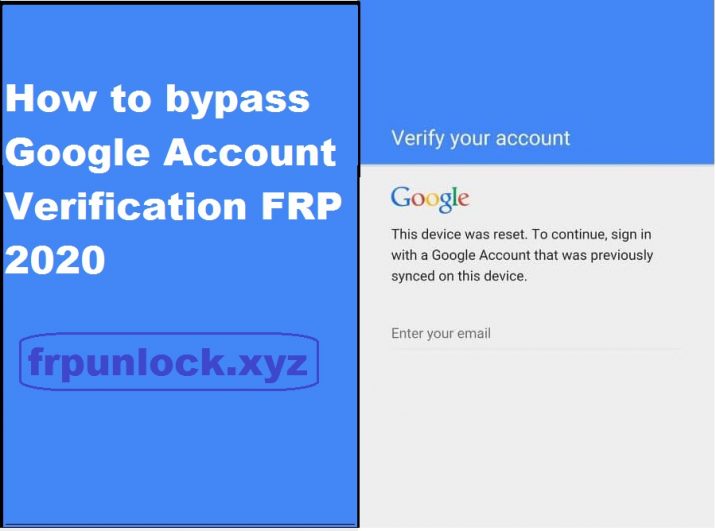
Along with the Android Lollipop 5.1 update, Google has introduced a new security feature designed to render the phone unavailable for usage in the unfortunate event when it might get stolen or lost, therefore protecting all the important data on it. However, this feature, despite being very useful, can cause some serious problems and put people in a situation in which they need to bypass Google account verification, so they can use the phone.
What’s the Google Account Verification and how it works?
Google Account Verification or Factory Reset Protection (FRP) is a security measure introduced by Google for Android platforms and devices running on the Android 5.1 Lollipop or above version. This functionality gets activated once you sign in to a Google Account on your Android device. And once it is activated, it will prevent you from using the phone until you enter the previous Google Account Credentials. It will remain the same as well even after doing the factory data reset. So, if you have the previous account details, then you’re good to go. Otherwise, you have to bypass the FRP lock if you are stuck up in similar screen below with message “This device was reset, to continue to sign in with a google account that was previously synced on this device.”
In this article, you will find a lot of instructions to bypass Google account verification or FRP on different phone brands like SAMSUNG, LG, HTC , ZTE, ALCATEL and so on.
How to bypass Google account verification for Samsung phones
Samsung handsets are among the best selling devices in the world, so this issue is very often encountered by their users, especially those who get used phones. If you want to learn how to bypass a Google account on a Samsung Galaxy, you can use the method below.

FRP Bypass for Samsung instructions
After performing a factory reset on the phone, wait until it reboots and prompts to choose a language. After choosing it, proceed to the next steps:
- Connect the phone to a Wifi Network (preferably your Home network)
- The next screen will ask you for the Google Account
- Tap the text field in which the account should be inserted until the Keyboard comes up
- Tap and hold the “@” character until a Settings menu pops up
- Select Google Keyboard Settings
- Tap on the 3 dots in the top part of the screen (or More depending on what Android OS you are running)
- Select the Help&Feedback item and select any item in the list that will follow

- From the Help section, tap on Using Google Keyboard.
- Long press to select any text on this page and click on Websearch in the upper right corner
- A search field will be shown (delete the text inside the search field)
- Type Settings in the search field
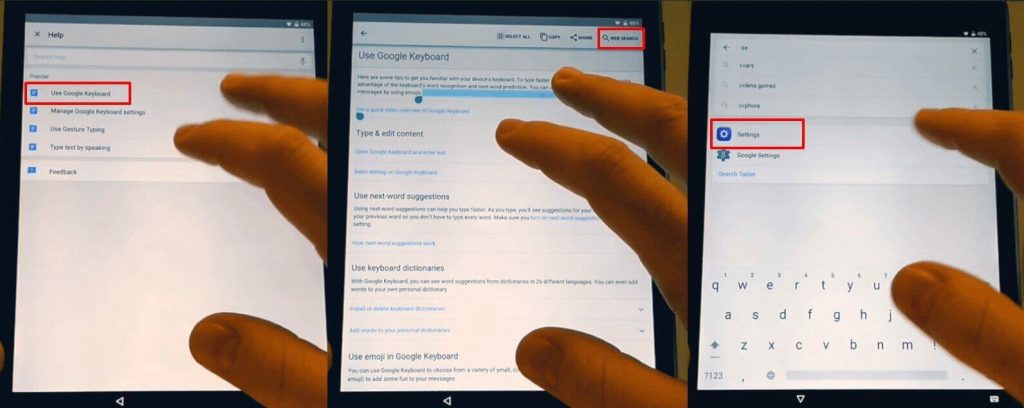
- Scroll down until you find“About Phone” and tap it.
- Enter the menu and look for Build Number. Tap 7 times on the Build Number to enable Developer Options
- Return to the previous menu and open the Developer Option that just appeared
- Allow OEM Unlocking and tap Back two times
- Restart the device
- Connect it to Wifi again
- Notice how you won’t be prompted to log in the previous Google Account and instead the phone will ask you to ADD a new Google Account
- Add the new account and your phone will be ready to use.
- And you’re done! This is how you can perform a FRP bypass for Samsung phones.
These steps should help you to easily perform a Samsung Galaxy J7 Google account bypass, for example, or for any other model running Android 5.1 Lollipop and above.
How to bypass Google account verification for LG phones
For LG phones, the process might be tricky and litte longer than samsung one but don’t be discouraged. Simply follow the steps below and you should be able to get rid of the FRP lock.

FRP bypass for LG instructions
- Connect the phone to a Wifi Network (preferably your Home network)
- Go back to the main Welcome screen and tap on Accessibility
- From this new menu, tap on Vision, followed by Talkback option, in the next menu
- Swipe up in this new menu and tap on Text-to-speech Output
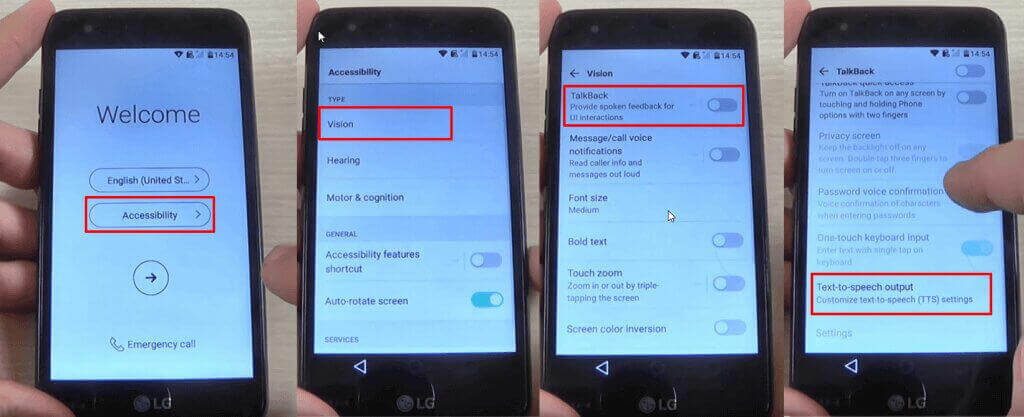
- Tap the Gear settings icon from Google Text-to-speech Engine
- Tap on Setting for Google Text-to-speech Engine
- Here, you should see the Feedback menu. Tap on it until a new submenu appears.
- You will see a field where you can type your feedback, as well as the “Include system logs” option. Right under it, you will see Terms of Service. Tap on those three words.
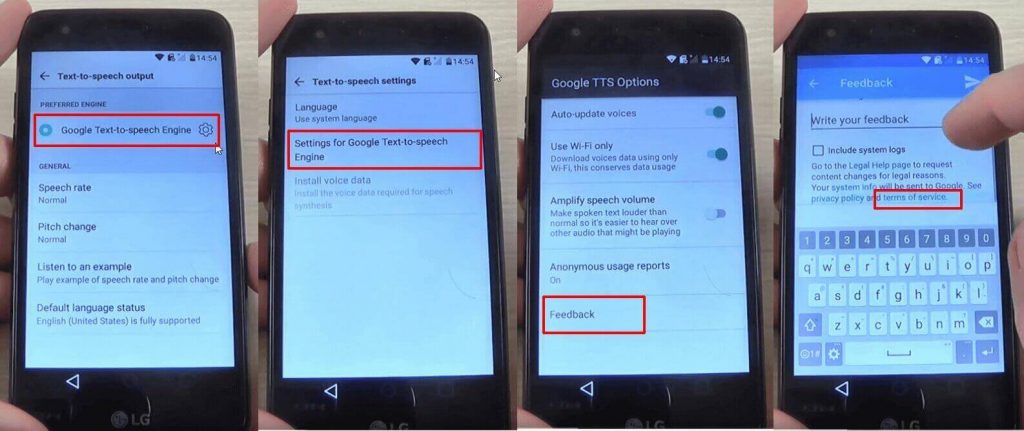
If you’ve reached this step, it’s great. You’re very close to the moment when you will bypass Google account verification on your LG.
After tapping on Terms of Service, a Google Chrome window will open. After it loads, follow these steps:
- Tap the No, Thanks button when asked to sign in
- Initially, you will be taken to the Terms of Service page. Tap the Google logo, in order to be taken to the homepage.
- Type “Test” in the search bar and search for it
- The first result should be from Wikipedia. Long press on the description under the title of the page. This will show a menu with two options: Copy and Share, as well as three vertical dots on the right side.
- Tap on the three dots. This will reveal a new menu, with three options: Select all, Web search, and Assist. Tap on Assist. This will reveal the phone’s search bar.
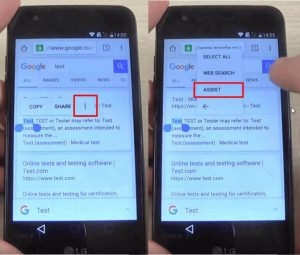
- Hit No, Thanks where you are asked to sign in.
- Type Settings in the search bar and open it
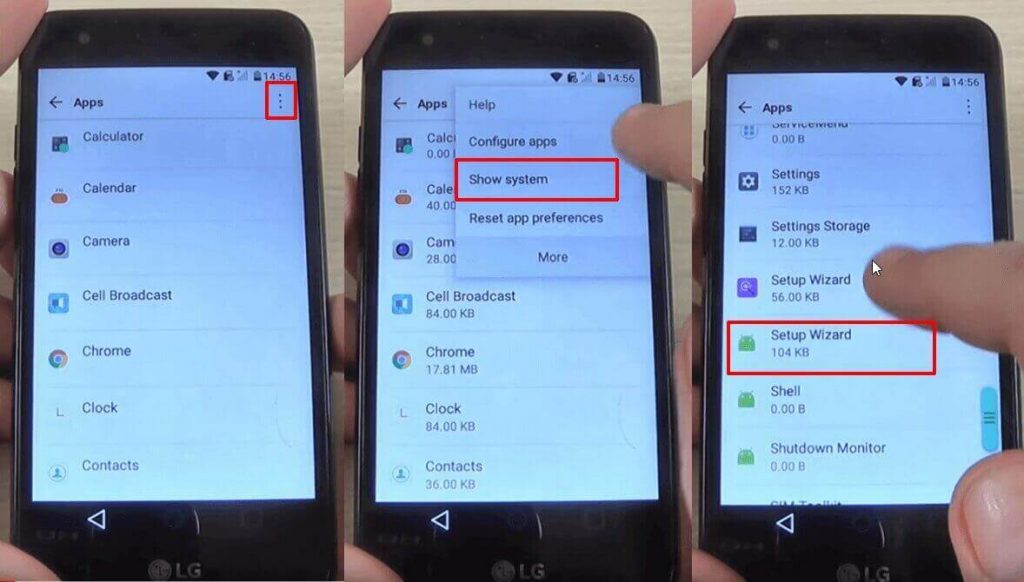
- After entering the Settings menu, look for Apps and tap on it
- In the Apps menu, tap on the three dots from the top right corner and pick the Show System option. You will see an entire list of your phone’s system apps
- In the list, look for Setup Wizard and tap on it
- Tap Force Stop, then OK
- Stay in the Setup Wizard menu, then tap on Storage. You will see the Clear Cache option. Tap on it
Another important step is ready. You’re almost done!
- Tap twice on the back key, in order to return to the Apps list
- From here, tap on Google Play services. Repeat the steps above: tap on Force Stop, then on Disable, followed by OK.
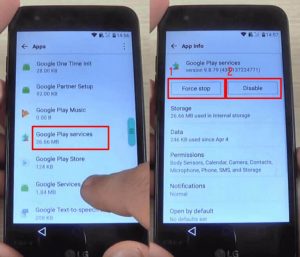
- Using the back key, go back to the Settings menu
- Restart your device. This will bypass Google account verification for LG
After the phone restarts, you need to complete your initial setup. Without connecting the phone to a Wi-Fi network, tap on the Next arrow from the phone’s welcome screen. After this, tap Skip.
If there is a Wi-Fi connection on your phone, long press on Wi-Fi network, then tap on Forget Network, then tap on Next. Tap Skip until you see the Protect this Device option, which needs to be unchecked.
After this, skip all screens until you get to the list with the Google Terms and Conditions. Check I agree and tap on Done.
Ok, just one more step. In order to successfully bypass Google verification, you need to reset the LG phone. Again, make sure you DO NOT connect it to Wi-Fi!
- Go to Settings > General > Backup & Reset
- Choose the Factory data reset option
- Go to Reset Phone > Delete all > Reset.
This is it! You’ve managed to remove the FRP lock from your LG.
How to bypass Google account verification for HTC phones
Unlike the procedure for LG phones, if you want to skip Google account verification for an HTC you will need a bit of extra time since there’s one additional step. But don’t worry, it’s not difficult. Simply go on with the steps below and you will be able to peform a FRP lock bypass on your HTC in no time.

FRP bypass for HTC instructions
- Reset the phone and power it back on
- Choose your preferred language, then tap on Start
- Connect the phone to a Wifi Network (preferably your Home network), then tap on Next
- When the Verify Your Account screen comes up, tap on the email/phone field. This will open the keyboard
- Long press on the Settings key. This will open the HTC Sense Input Settings screen
- Here, tap on Personal Dictionary, then long press on HTCVR. After this, tap Share
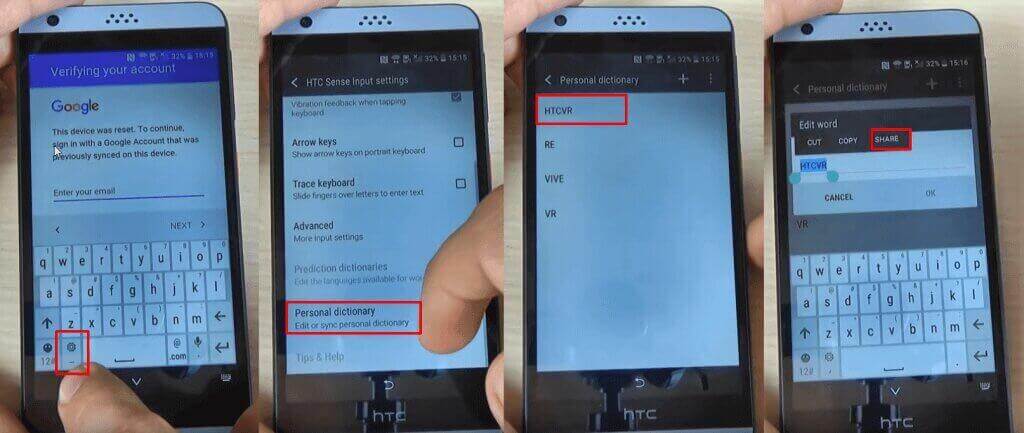
- You will see some sharing options. Long press on the Gmail icon, which will open the App info page
- Tap on Notifications, then on App Settings
- Click on the three dots in the top right corner of the screen and select Manage Accounts. A pop-up message will appear. Tap Continue
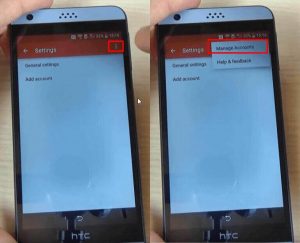
- You should be redirected to your phone’s Settings menu. Scroll until you find Google and tap on it
- From the Google submenu, tap on Search and Now, then select Now Cards and enable them, by tapping on Show Cards
- On the next screen, select “No, Thanks”. This will get you to the Google search bar
- In the search bar, type “Google” and tap on the first link that appears. When the page opens, tap on “No, Thanks” once again. This will take you to Google Search
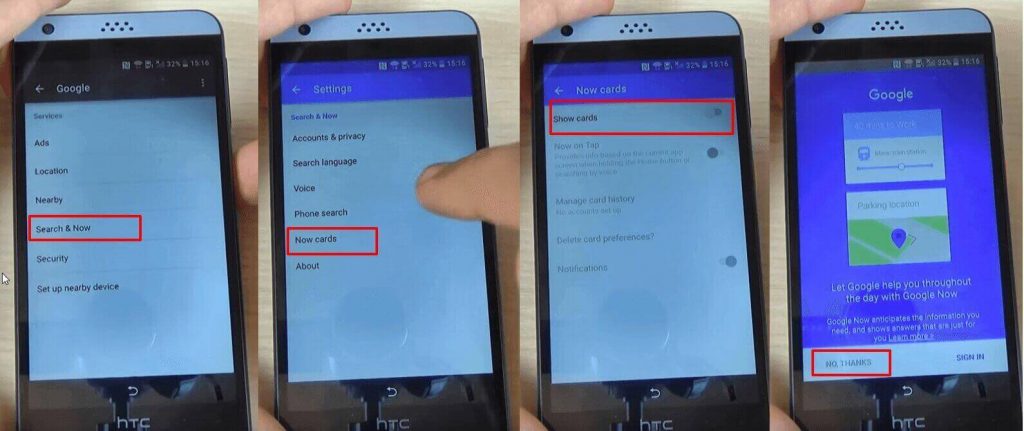
- In search, type Google, then tap on the first result, which is Google Home. Tap on it
- You will be prompted to set up Chrome, so hit the “No, Thank you” button
- Search for Quick ShortcutMaker and open the second link that appears. From here, download “APK from APK 2.0”, using the link at the bottom of the page.
- After downloading the file, go back until you see the screen where you can enable Show Cards and enable them. You will be prompted once again to set up Chrome, so hit “No, Thanks”
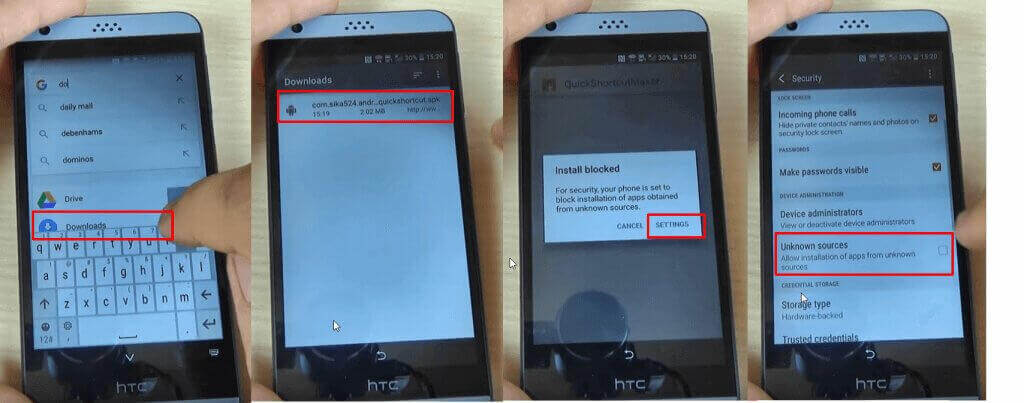
- You will be taken to Search. Here, type Downloads, in order to access the folder where you saved the app
- You will see the app, so tap on it, in order to begin installation
- The phone will say the installation is blocked, due to security reasons, so tap on Settings in the pop-up window
- Check Unknown Sources, then tap Ok
- Go back and tap on the downloaded app once again, then on the Install button
- Wait until the process is over
The app you’ve just installed is essential if you want to bypass Factory Reset Protection on HTC. And don’t worry, it’s completely safe and it won’t damage your phone. Ok, let’s see what’s next.
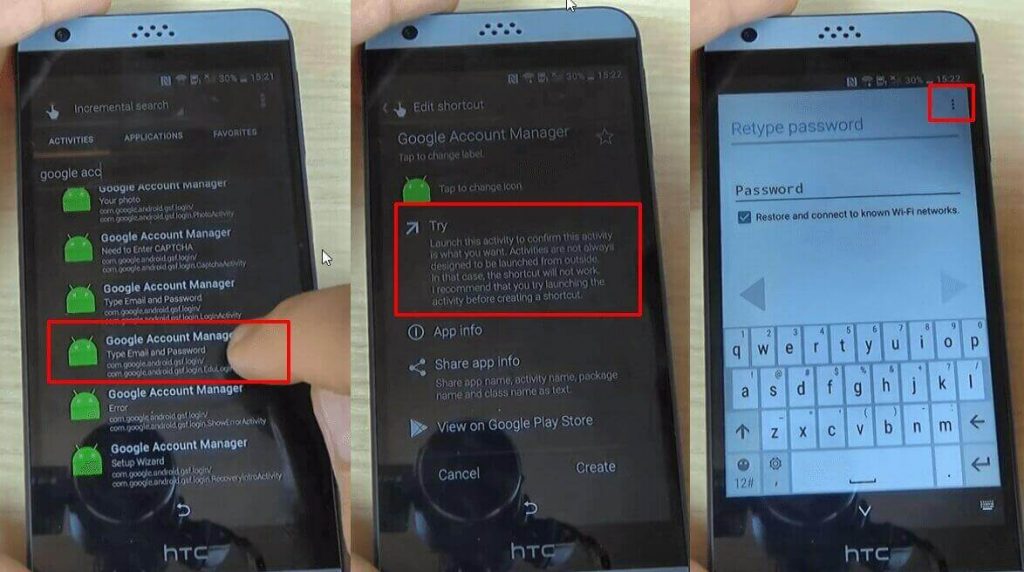
- After the installation is completed, click on Open and look for Google Account Manager, with “Type E-mail and Password” written under. Tap on it
- Tap on Try, then tap the three dots that appear in the Retype Password screen
- Select Browser Sign-in, then Ok
- Enter a fresh Google account
- Restart your phone and set it up again. You won’t see the FRP lock screen anymore
- Go to the Settings menu > Backup & reset. Perform a factory data reset, in order to complete the FRP lock removal process.
This is it! You’ve managed to remove the FRP lock from your HTC smart phone.
How to bypass Google account verification for ZTE
It looks like several owners are also dealing with this problem, so we’ve put together the instructions for a ZTE Google account bypass.

FRP bypass for ZTE instructions
- Reset the phone and power it back on
- Choose your preferred language, then tap on Start
- Connect the phone to a Wifi Network (preferably your Home network)
- Skip several steps of the setup until you reach the Verify Account screen
- Tap on the email field, in order to activate the keyboard
- Most ZTE phones come with the Swift Key keyboard, so you need to tap on the keyboard’s menu key.
- Select Settings from the menu
- From the Settings menu within SwiftKey select Languages
- Minimize the menu on the screen, then go to the Google search bar
- When prompted to sign in with a Google Account, choose “No, Thanks”
- In the Google search bar, type “Settings” and select it. If the SwiftKey menu pops up again, tap on Got it, then Not Now.
- From the Settings menu select Backup and Reset
- From this submenu, choose Factory Data Reset. Go through the entire process and reset your handset again. However, this time you won’t see the FRP lock.
If you had any trouble performing these above-mentioned steps here is a very helpful video that will guide you through the process. The method is slightly different and it will work just for devices featuring the same user’s interface, but it’s another working way to bypass Google account verification on ZTE phones. Additionally, there is a FRP bypass apk for ZTE, but it’s not recommended, since there’s no guarantee that it will work, so you can try it at your own risk.
How to bypass Google account verification for Alcatel
Alcatel is another brand prone to dealing with FRP lock issues. Fortunately, we found some instructions on how to bypass Google verification on Alcatel One Touch models, Idol, Pixi, Fierce, and other models coming from this brand.

FRP bypass for Alcatel instructions
- Reset the phone and power it back on
- Choose your preferred language, then tap on Start
- Connect the phone to a Wifi Network (preferably your Home network)
- Skip several steps of the setup until you reach the Verify Account screen
- Tap on the email field, in order to activate the keyboard, and type anything you want
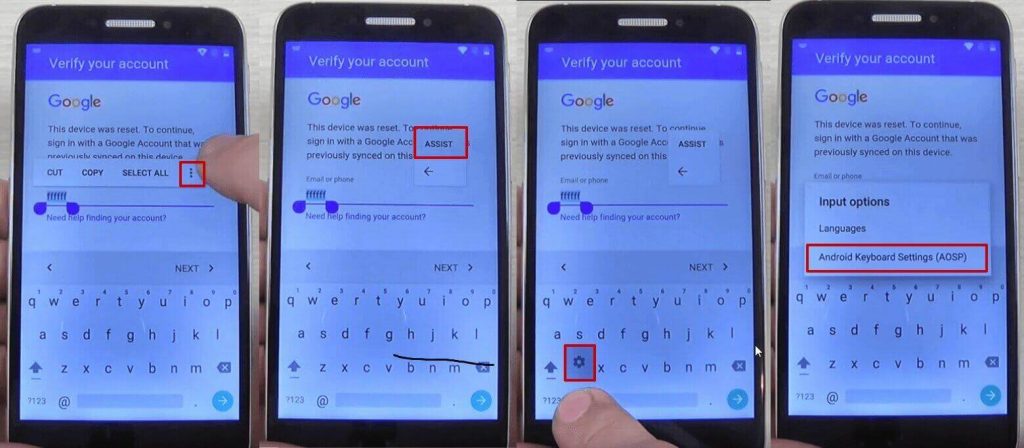
- Long press the text you entered, until a menu with Cut, Copy, Select all, and three dots appear. Press the three dots.
- The Assist option will appear. Tap on it. In most cases, this won’t work, so press the @ symbol at the bottom of the keyboard, until the Gear icon appears. Tap on that one.
- A new menu will appear. From here, tap on Android Keyboard Settings.
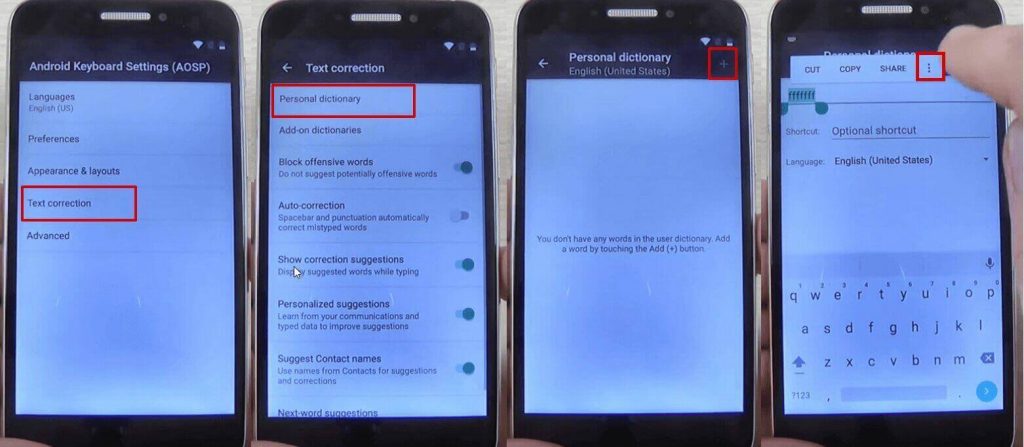
- From this new menu, tap on Text Correction, then go to Personal Dictionary and tap on English (United States)
- Tap on the + icon in the upper right corner
- On the first field, type anything you want and long press on the text until a menu appears, with Cut, Copy, Share, and three dots. Tap on the three dots
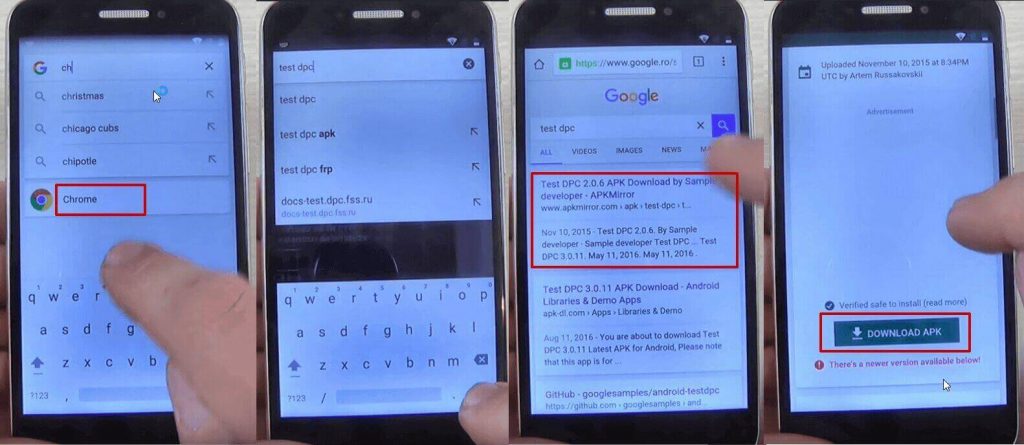
- You will be taken to Google Search. Here, type “chrome” in the search bar and tap on it from the drop-down menu
- Tap on Accept and Continue, then No, thanks
- In Chrome’s search bar, type “test dpc” and tap on it
- Tap on the first result
- Scroll to the bottom of the page and tap Download APK. This will begin the FRP bypass tool download.
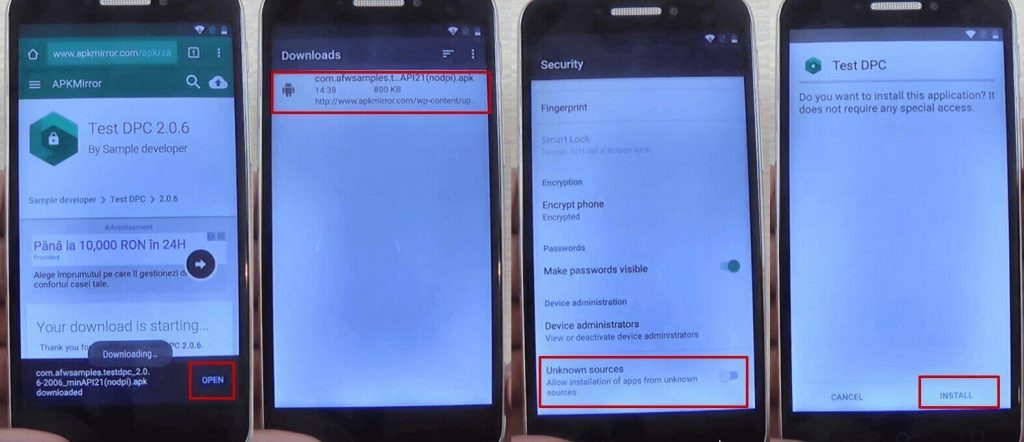
- You will get a message saying that the download could harm your device since it’s from an external source. Tap Ok
- Wait for a few moments, until the FRP bypass tool is downloaded on your phone.
- Tap on the apk package you just downloaded, in order to start installing it. Your phone will show a pop-up, saying that the installation is blocked. Tap on the Settings button and allow installation from unknown sources, then tap Ok
- Hit the back key until you see the apk package again and tap on it
- You will be asked if you want to install Test DPC, the FRP bypass apk, so tap the install button.
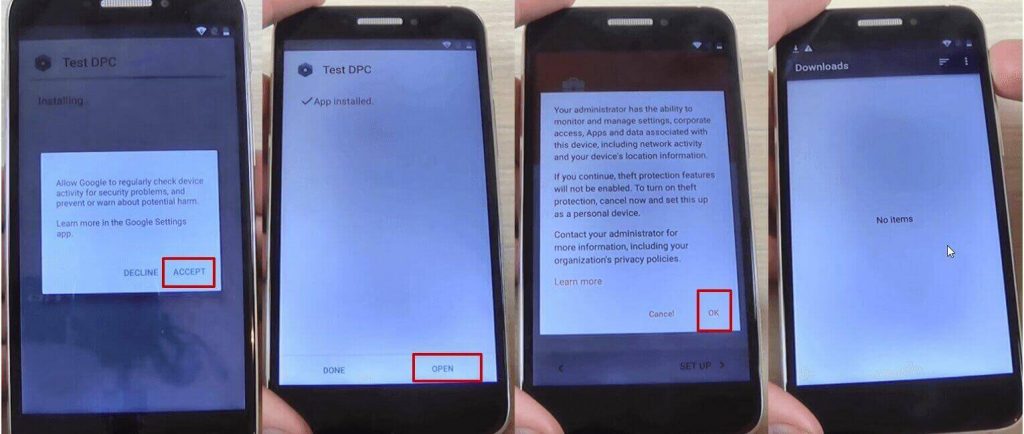
- During the installation process of the FRP lock app you will see a pop-up message. Tap on Accept
- Wait until the installation process is ready and tap on Open
- You will see the Setup Management screen. Tap on Set up device owner, then Set up
- In the next screen, tap on Set up. A new pop-up message will be shown. Tap on Ok
- Wait until the device owner is being set
- The FRP bypass apk for Android package will show once again, but will shortly disappear and the Downloads folder will be shown, with no items in it.
- Restart your phone
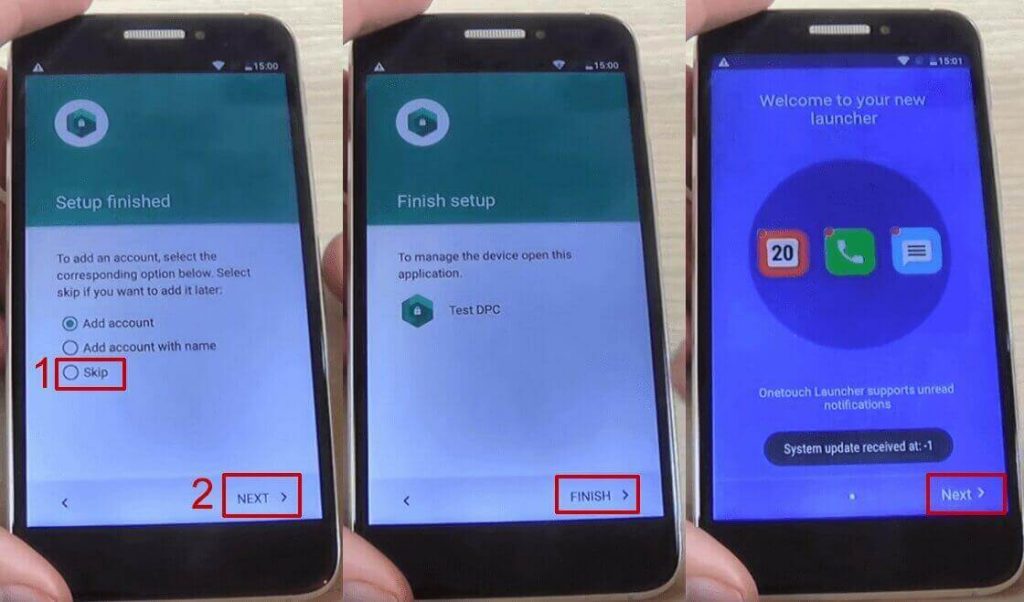
- Unlock the phone and you will be taken automatically to the Test DPC app, which will show the Set up finished screen
- Check Skip, then tap on Next
- On the next screen, tap Finish. You will be taken to the initial setup process. Click next until you are taken to the phone’s home screen
- Go to Settings > Backup and reset > Factory data reset and tap on Reset Phone
- Tap on Reset Everything
- Wait until the phone restarts and go through the setup process
- DO NOT connect to a Wi-Fi network, then hit Next until the setup is finished
- Configure the phone’s launcher
- That’s it, your phone won’t ask for the Google account anymore.
If this method doesn’t work, due to your phone coming with another keyboard, you can try the steps below:
- Reset the phone and power it back on
- Choose your preferred language, then tap on Start
- Connect the phone to a Wifi Network (preferably your Home network)
- Skip several steps of the setup until you reach the Verify Account screen
- Tap on the email field, in order to activate the keyboard, and type anything you want
- Tap on the hand key, in the bottom left corner. This will take you to the Swype keyboard’s menu
- From this menu, type on Gestures
- Scroll down until you find the Search option, with the “Highlight some text and Swipe from the *swipe key* to the S to do a quick web search” text
This previous step is very important since it actually shows you how you can make a search, even though the phone has a FRP Android lock.
- Tap the back key twice, until you get to the Verify your account screen again
- Type on the Enter your email field again, to make the keyboard pop up, and write a random text, like “bypass test”
- Swipe from the bottom left corner button until the letter “S” on the keyboard. This should open the Google Search app
- In Search, type Settings and select it
- Go to Backup & Reset > Factory data reset and tap on it
- Tap the Reset Phone button, at the bottom. Confirm with the Erase Everything button.After this, your phone will restart
- You will be taken to the initial setup menu. Select English as your language, then tap the Next button
- Tap Skip/Next until you get to the phone’s home screen. While going through these steps, you will be asked to connect to a Wi-Fi network. DO NOT connect.
And that’s it! Your Alcatel phone won’t ask for the Google account verification anymore.
If you want to disable FRP lock, simply follow the below procedure.
How to disable Factory Reset Protection on Android
By default, the feature is automatically enabled once you add a Google account to your phone. In order to disable it, everything you need to do is remove your account.
Go to Settings > Accounts > Google and choose your account. Tap on it, then click on the icon on the top right corner. Here, you will see a menu with three options, including Remove account.